Polyaxon, Argo and Seldon for model training, package and deployment in Kubernetes
In it’s simplest form, model management can be seen as training one machine learning model, then repeating this tens, hundreds, or thousands of times with different data, parameters, features and algorithms to finally deploy the “best” one. A more complete definition would be that model management involves developing tooling and pipelines for data scientists to develop, deploy, measure, improve and iterate so they can continue making better models not only for one particular problem but wider range of datasets and algorithms.
At the same time model management includes all the requirements of more traditional applications such as API development and versioning, package management, containerization, reproducibility, scale, monitoring, logging and more.
The objective of this article is to propose a repeatable pipeline to make your life easier and make iterations faster. I think this quote captures the spirit pretty well.
We don’t deploy one model, we deploy the process for repeatedly making more. When you deploy a ML model into production you are not saying “this is the best model and we should use it forever”. What it actually means is deploying the pipeline for model building and making it more repeatable.
How Did We Get Here
This year we have seen the rise of machine learning platforms, just at Strata we have seen the tide change from data storage solutions, to SQL engines for data in those storage solutions, to Spark, to data science platforms to the now popular machine learning platforms. The difference are between some of those is quite subjective and a combination of these tools tailored for your use-case is needed to achieve good results.
In the same way that Google released the MapReduce and other papers for the rest of the world to follow the years after with the Hadoop ecosystem, tooling from Google and other big tech companies has come up to solve the Machine Learning problem. I even connect this in a way with Kubernetes, that was so young 2 years ago and has become a key part of every cloud provider offering right now, at this point it would be dumb to not bet on the CNCF stack. Projects also includes TensorFlow and more recently KubeFlow that provides more guidance on a combination of tools.
A ML model has a lot of different requirements, for development/training you need GPUs, packaging is more complicated that just a JAR file since there is no one language you can use for everything, you need Python, R with other parts written in C and C++. The application went from 10s of Mb to +100s of Mb since models have a lot of data inside of them. They went from endpoints being basically database operations that took a couple of milliseconds to smarter operation that make predictions but take longer to execute, require more CPU and more RAM.
At the same time the traditional requirements of logging, monitoring, security, scalability and others that more traditional applications have are also needed for this new types of applications. If you did A/B testing for experimenting with sections on a website you will now do A/B testing for all your ML models to see which one is performing better with real data. If you scaled a Node web server you now need to scale a TensorFlow Serving server, and so on. At the same time development of the ML models is also much more complex and takes more time since it requires testing combinations of algorithms, features and more variables.
You can get so much value from ML compared to traditional applications but the investment you need to do is huge in many areas.
This Experiment
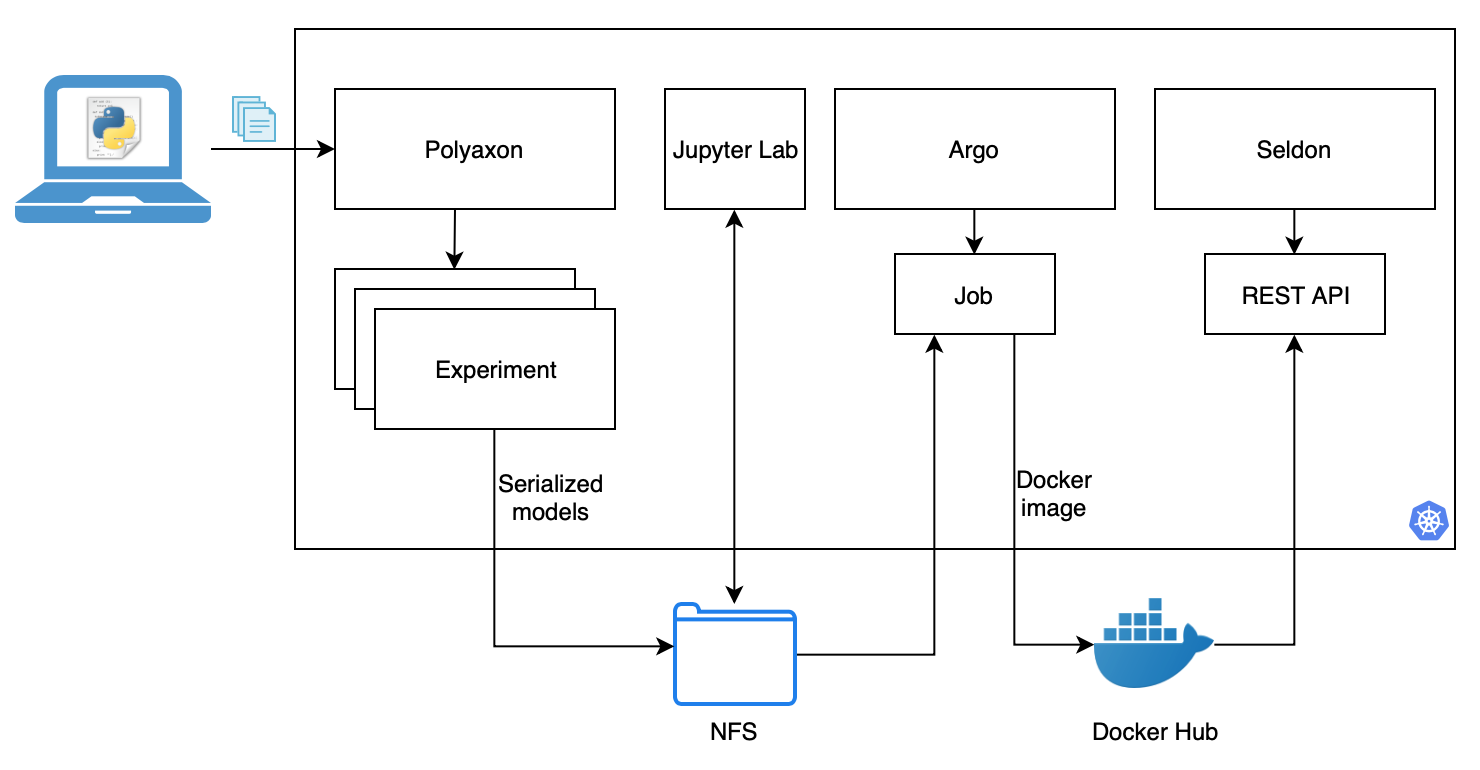
This articles explores the combination of a couple of new technologies for model management to provide a pipeline that solves three primary groups of problems:
- Distributed hyper-parameter training, that could also be used to actual distributed training: Polyaxon
- A container image building pipeline that uses s2i: Argo
- Deployment of a model that can handle single or more complex deployments: Seldon
The final output is a ML pipeline that trains multiple models, explore the metrics to (manually) pick the best, package the model as a docker image and deploys it as a REST API.
All the code needed to follow along can be found here: danielfrg/polyaxon-argo-seldon-example. Locally you won’t need much more than a couple of client CLIs and clone a couple of repos.
$ brew install kubectx
$ brew install kubernetes-helm
$ pip install polyaxon-cli
$ brew install argoproj/tap/argo

$ git clone https://github.com/danielfrg/polyaxon-argo-seldon-example.git
$ git clone https://github.com/SeldonIO/seldon-core.git
Infrastructure and installation
This section is a small reference from each project documentation so be sure to read that if something here doesn’t work or gets outdated.
The next few sections will walk through the installation and configuration of five components that we’ll use to build a model deployment pipeline:
- Kubernetes cluster
- NFS for persistent storage
- Polyaxon for distributed model training
- Argo to build a model containerization workflow
- Seldon for model deployment
Once we installed and configured each of these components, we’ll train, build, package, and deploy a model starting in Section “Polyaxon: Training models”. So just go there if you want to skip all the installation bits.
Kubernetes cluster
I used GKE but it could be any Kubernetes cluster, either use the GCP console or with a command like this one:
$ gcloud beta container --project "<project-name>" clusters create "model-mgmt" --zone "us-central1-a" --cluster-version "1.10.7-gke.2" --machine-type "n1-standard-2" --image-type "COS" --disk-size "10" --num-nodes "3" --network "default"Configure your local kubectl:
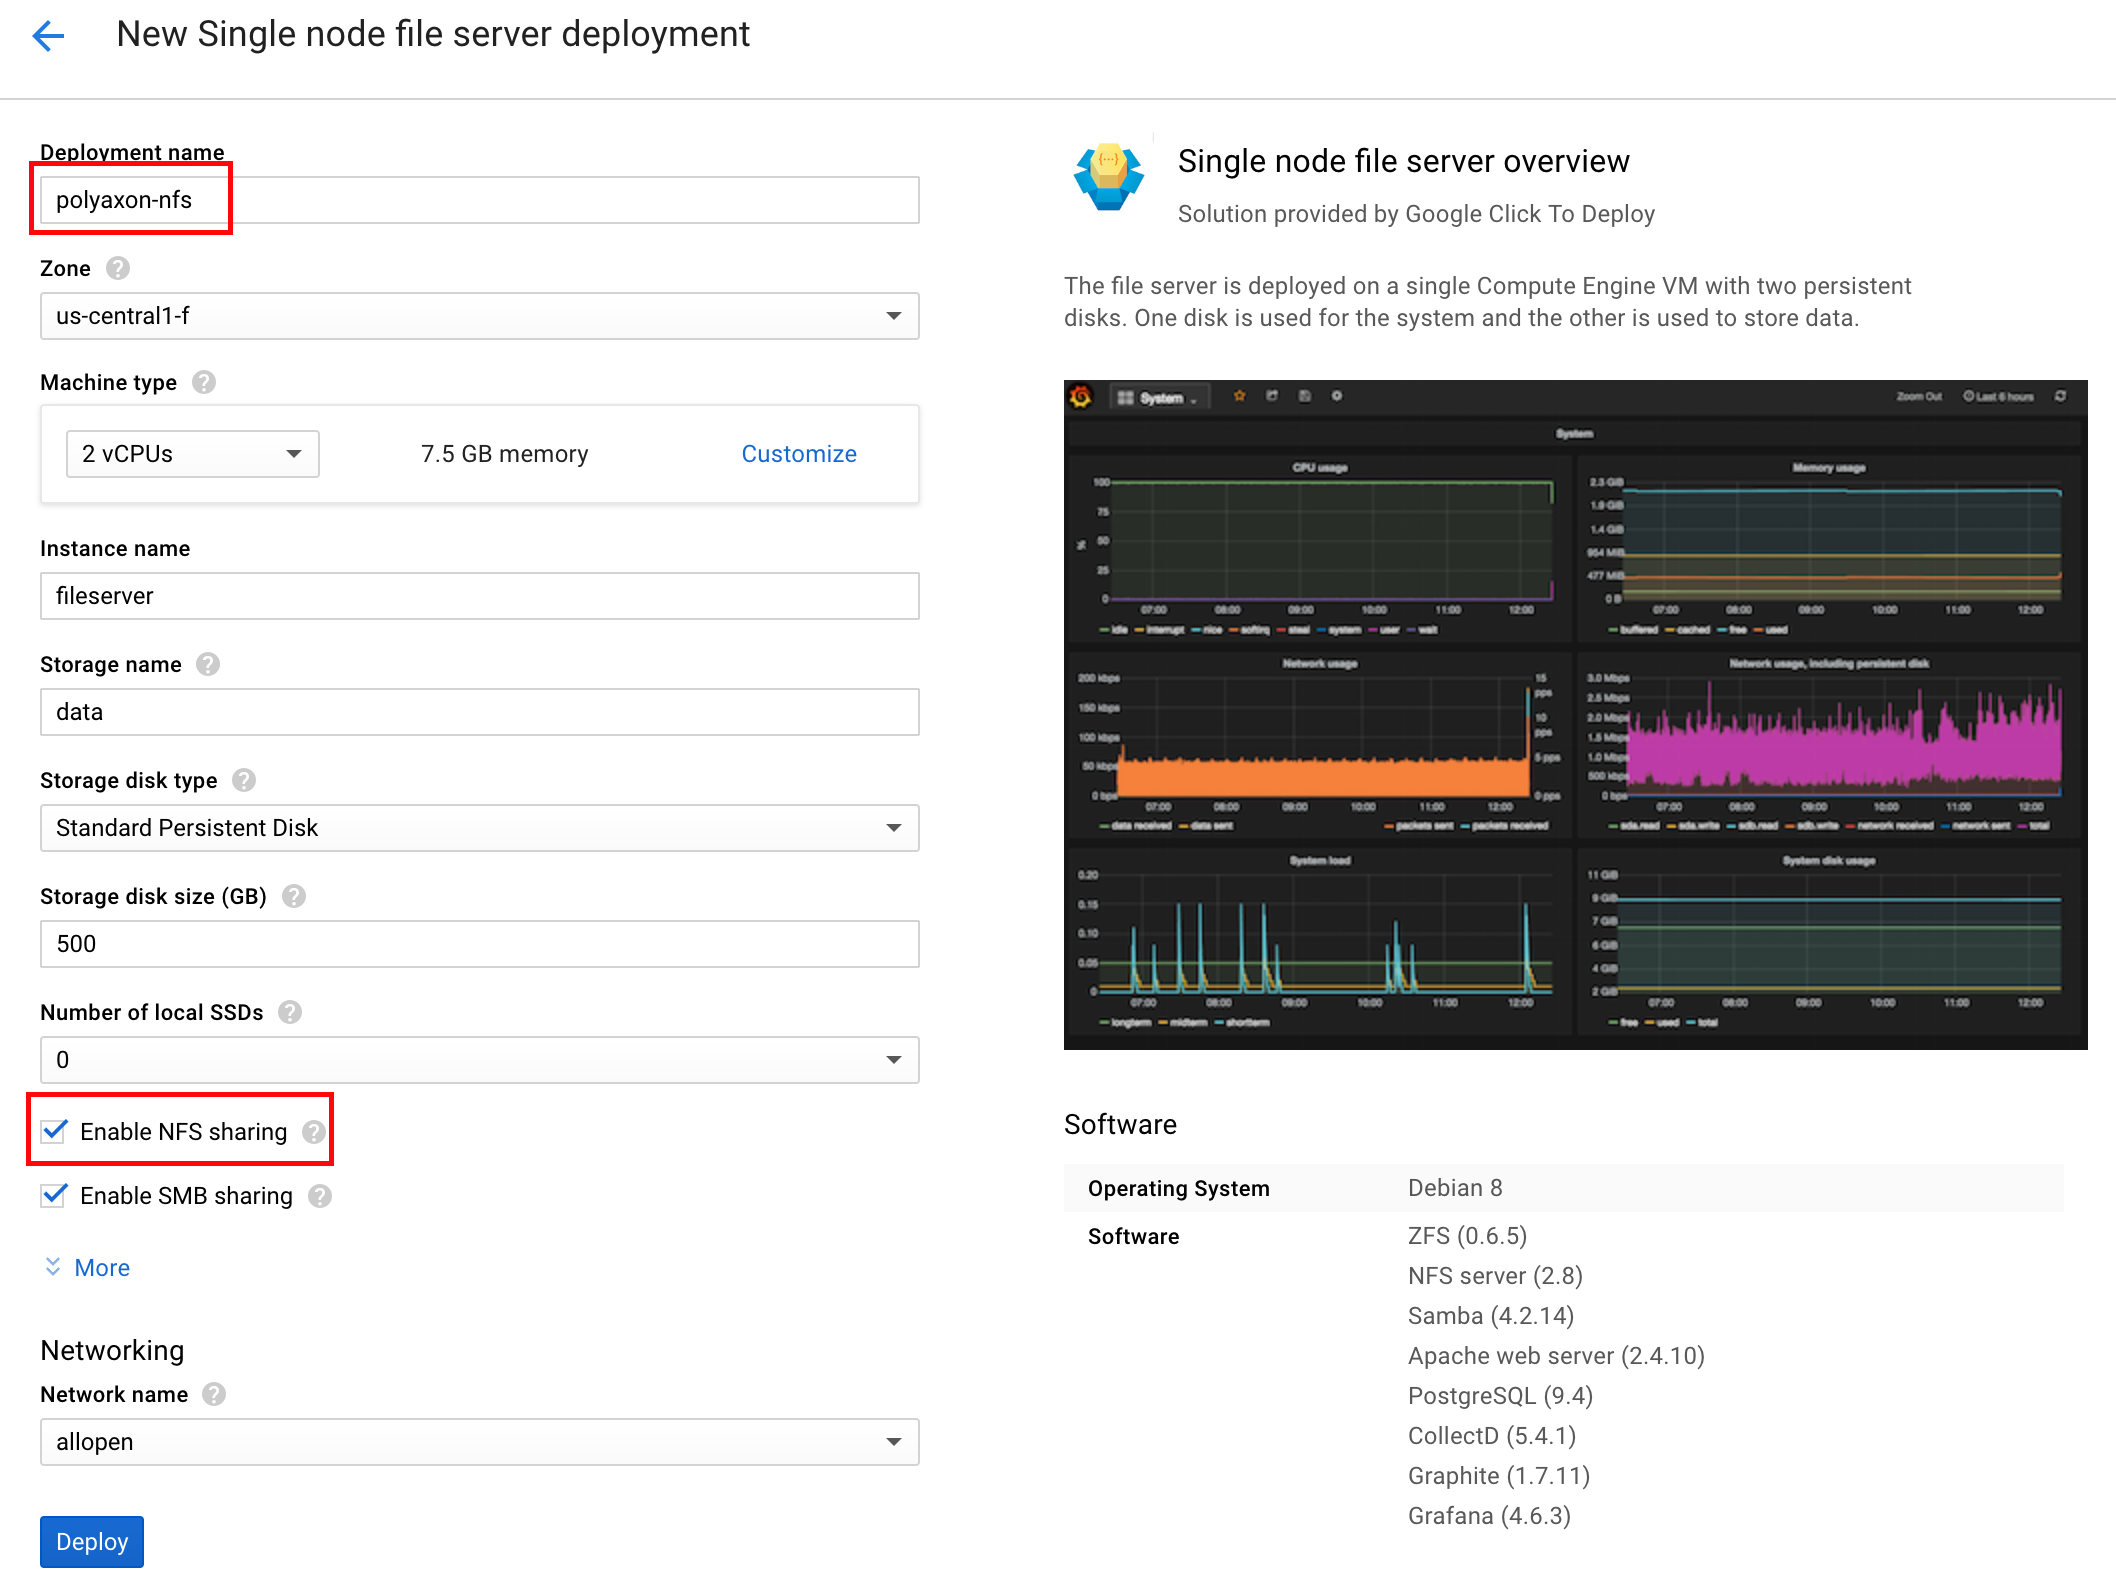
$ gcloud container clusters get-credentials model-mgmt --zone us-central1-aNFS: Single Node Filer
This is where all the code, models and data is saved. It’s super easy to create one using the this GCP Single node file server template.
We need to create a couple of directories in the NFS server, so SSH into the node by copying the command available in the post install screen or just clicking the “SSH to …” button.
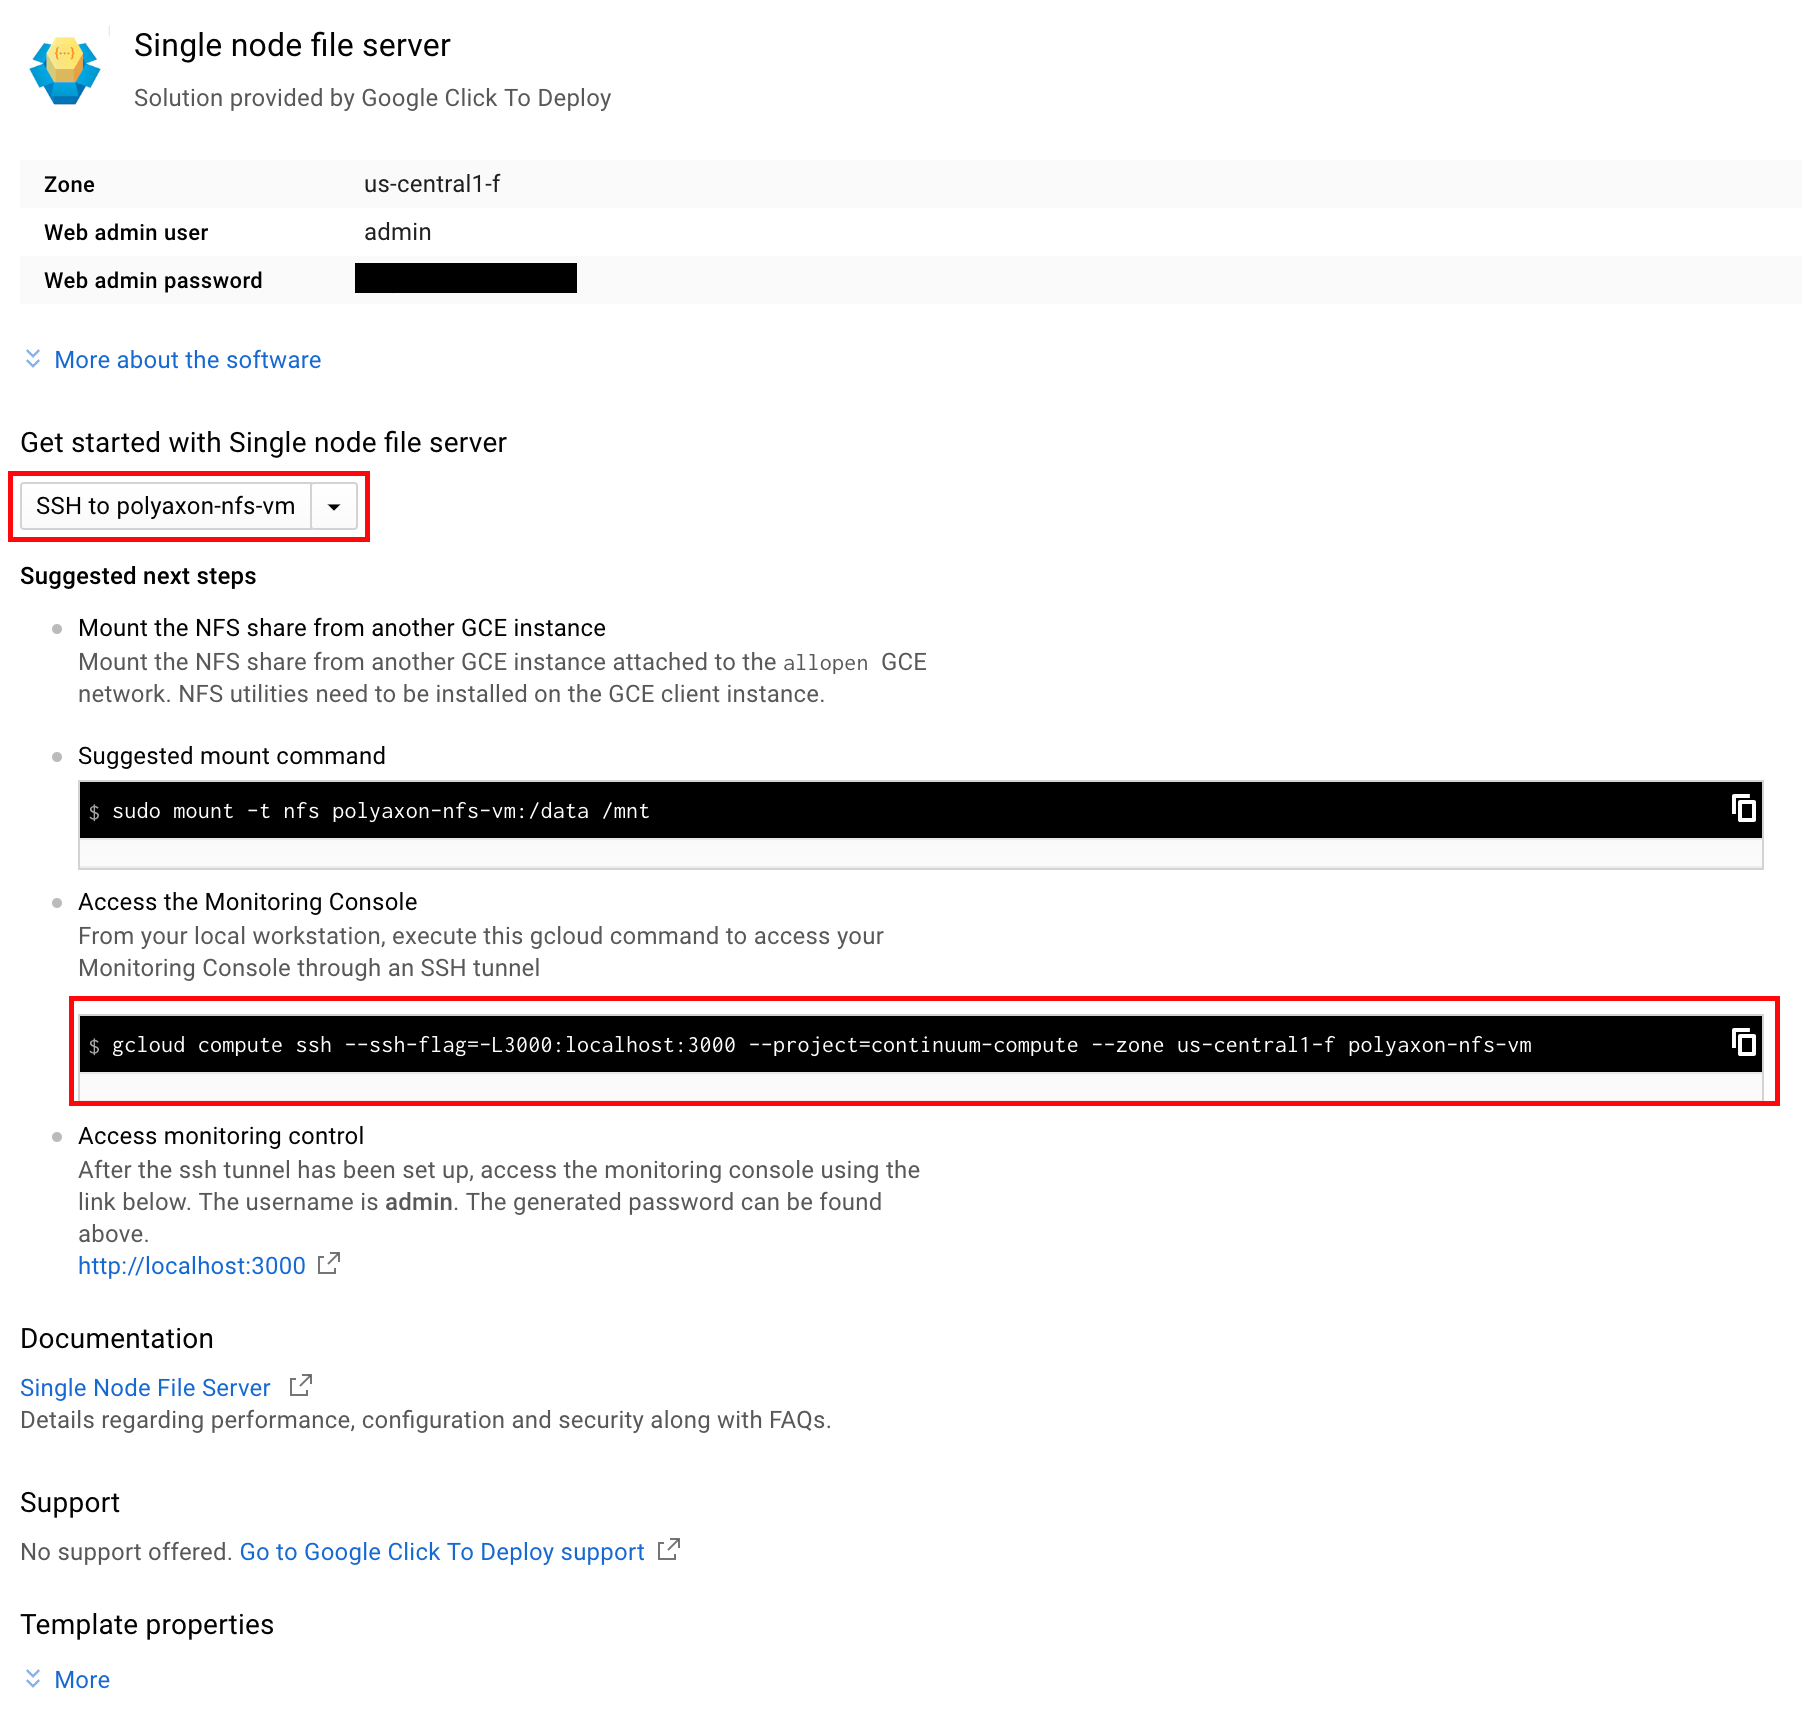
Once in the instance create some directory structure for Polyaxon and Jupyter Lab and Argo later.
$ cd /data
$ mkdir -m 777 data
$ mkdir -m 777 outputs
$ mkdir -m 777 logs
$ mkdir -m 777 repos
$ mkdir -m 777 upload

$ cd repos
$ mkdir deployments/
$ chmod 777 deployments/
Get the (private) IP of the NFS server either with the command below or just search for it on the Google Cloud console in the VMs. In my case 10.240.0.8.
$ gcloud compute instances describe polyaxon-nfs-vm --zone=us-central1-f --format='value(networkInterfaces[0].networkIP)'
10.240.0.8
Finally create some PVCs for Polyaxon and the other tools to use. Note that you need to edit the *-pvc.yml files and add the correct IP Address:
$ cd <polyaxon-argo-seldon-example repo>
$ cd gke/

# And replace with the right ip address in all the files
$ vi data-pvc.yml
$ vi outputs-pvc.yml
$ vi logs-pvc.yml
$ vi repos-pvc.yml
$ vi upload-pvc.yml

# Create the k8s resources
$ kubectl create namespace polyaxon
$ kubens polyaxon
$ kubectl apply -f data-pvc.yml
$ kubectl apply -f outputs-pvc.yml
$ kubectl apply -f logs-pvc.yml
$ kubectl apply -f repos-pvc.yml
$ kubectl apply -f upload-pvc.yml
Installing Polyaxon
With the PVCs already created it’s relatively easy to install it based on the docs. First some permissions for the tiller (helm server) service account.
# Configure tiller to have the access it needs
$ kubectl --namespace kube-system create sa tiller
$ kubectl create clusterrolebinding tiller --clusterrole cluster-admin --serviceaccount=kube-system:tiller
$ helm init --service-account tiller

# Add polyaxon charts
$ helm repo add polyaxon https://charts.polyaxon.com
$ helm repo update
Now we can start Polyaxon using Helm, the only extra thing we need is a polyaxon-config.yml config file and run Helm:
rbac:
  enabled: true

ingress:
  enabled: true

serviceType: ClusterIP

persistence:
  logs:
    existingClaim: polyaxon-pvc-logs
  repos:
    existingClaim: polyaxon-pvc-repos
  upload:
    existingClaim: polyaxon-pvc-upload
  data:
    data1:
      existingClaim: polyaxon-pvc-data
      mountPath: /data
  outputs:
    outputs1:
      existingClaim: polyaxon-pvc-outputs
      mountPath: /outputs
$ cd <polyaxon-argo-seldon-example repo>
$ cd polyaxon
$ helm install polyaxon/polyaxon --name=polyaxon --namespace=polyaxon -f polyaxon/polyaxon-config.ymlWhen the command finishes you will get something like this:
Polyaxon is currently running:

1. Get the application URL by running these commands:
    export POLYAXON_IP=$(kubectl get svc --namespace polyaxon polyaxon-polyaxon-ingress -o jsonpath='{.status.loadBalancer.ingress[0].ip}')
    export POLYAXON_HTTP_PORT=80
    export POLYAXON_WS_PORT=80

    echo http://$POLYAXON_IP:$POLYAXON_HTTP_PORT

2. Setup your cli by running theses commands:
  polyaxon config set --host=$POLYAXON_IP --http_port=$POLYAXON_HTTP_PORT  --ws_port=$POLYAXON_WS_PORT

3. Log in with superuser

  USER: root
  PASSWORD: Get login password with

    kubectl get secret --namespace polyaxon polyaxon-polyaxon-secret -o jsonpath="{.data.POLYAXON_ADMIN_PASSWORD}" | base64 --decode
So execute those instructions and login using the polyaxon-cli. The default username:password pair is: root:rootpassword:
$ polyaxon login --username=root --password=rootpasswordYou can also visit the URL that is printed to visit the Polyaxon UI.
Installing Argo
Full docs here (the permissions section is important), basically:
$ kubectl create ns argo
$ kubectl apply -n argo -f https://raw.githubusercontent.com/argoproj/argo/v2.2.1/manifests/install.yaml
$ kubectl create rolebinding default-admin --clusterrole=admin --serviceaccount=default:default
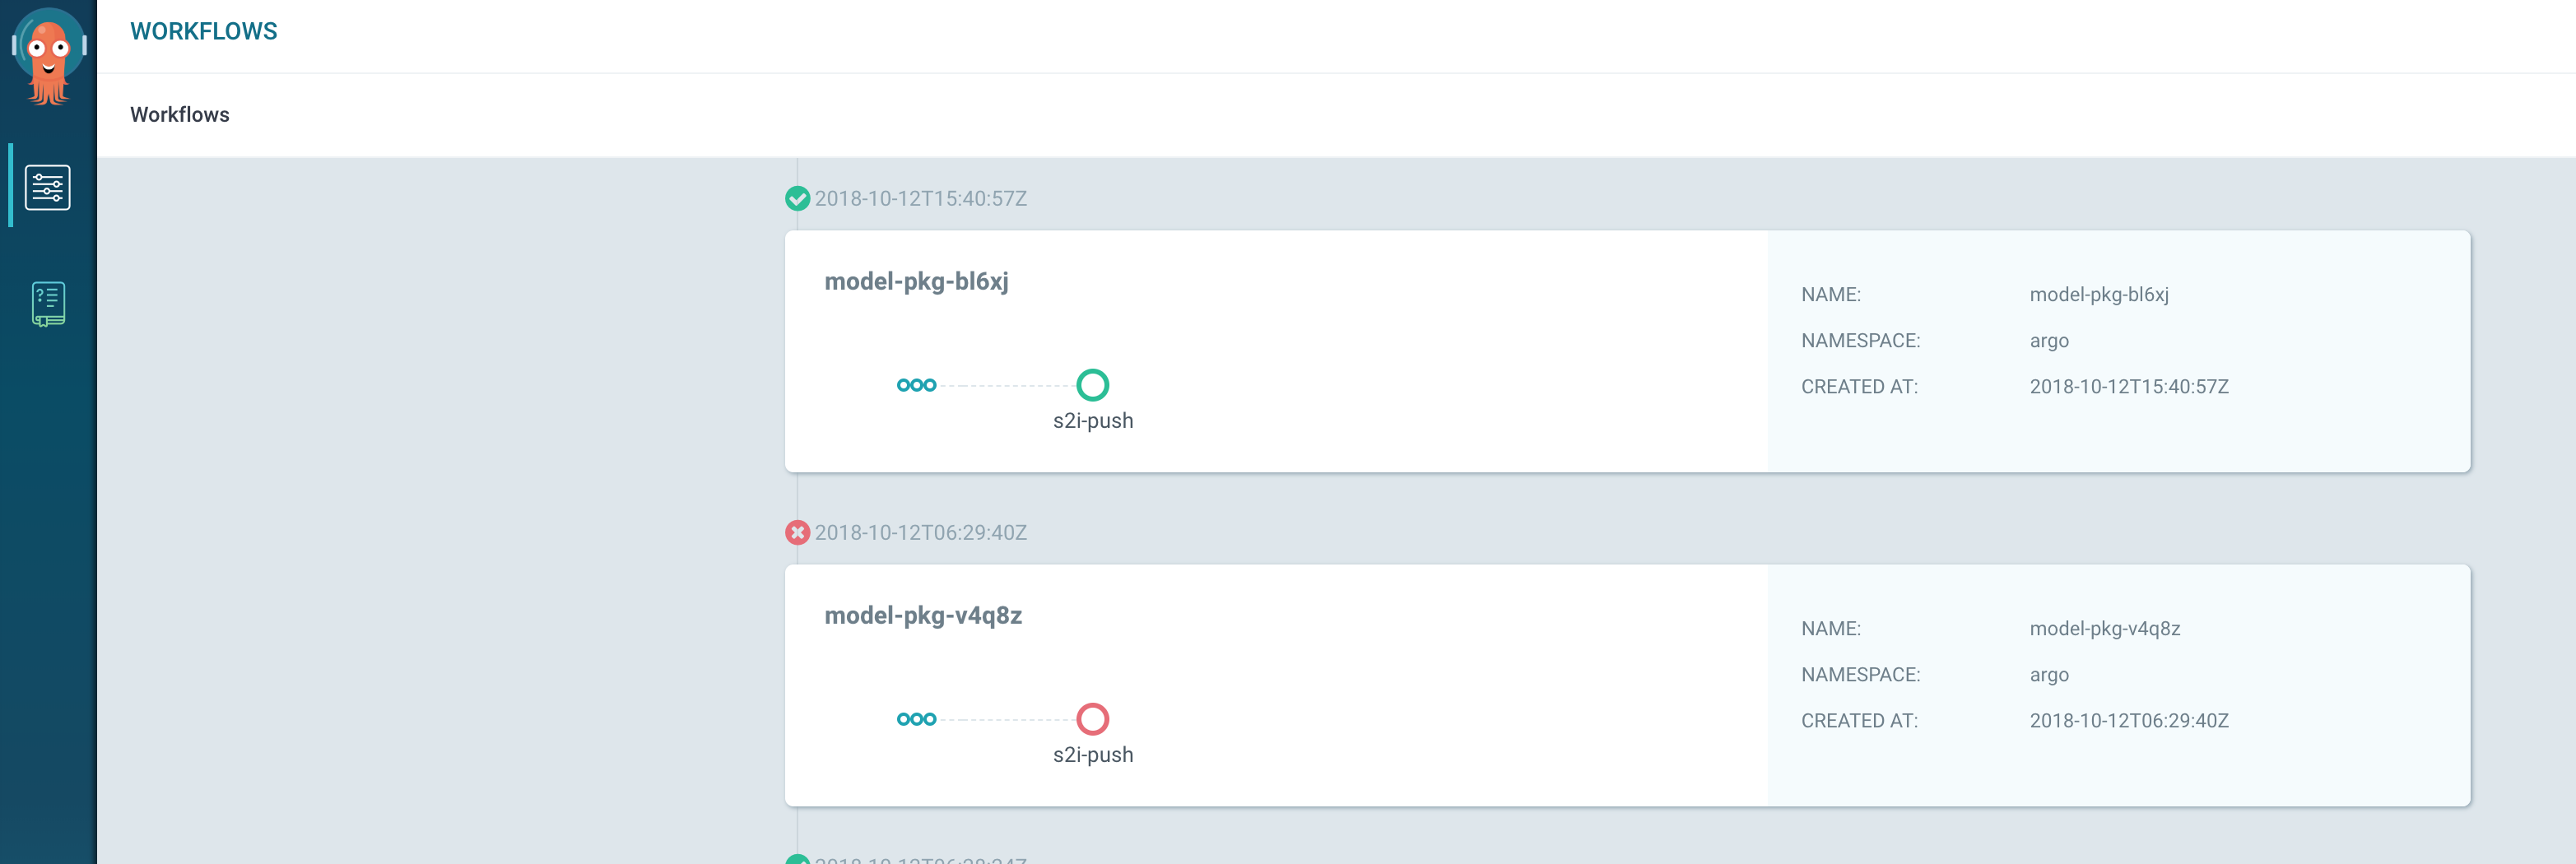
$ kubectl patch svc argo-ui -n argo -p '{"spec": {"type": "LoadBalancer"}}'Now we could visit the argo UI that looks like this with a couple of workflows:
Installing Seldon
There is multiple ways to install Seldon, I picked to use helm because I honestly don’t fully understand ksonnet.
$ cd <seldon-core repo>

$ kubectl create namespace seldon
$ kubens seldon
$ kubectl create clusterrolebinding kube-system-cluster-admin --clusterrole=cluster-admin --serviceaccount=kube-system:default

$ helm install ./helm-charts/seldon-core-crd --name seldon-core-crd --set usage_metrics.enabled=true
$ helm install ./helm-charts/seldon-core --name seldon-core --namespace seldon  --set ambassador.enabled=true
Run this in another terminal to proxy the Ambassador service:
$ kubectl port-forward $(kubectl get pods -n seldon -l service=ambassador -o jsonpath='{.items[0].metadata.name}') -n seldon 8003:8080We have finally installed all we need, let’s train and deploy some models!
Polyaxon: Training models
Polyaxon is a tool for reproducible machine learning. It allows you to push parameterized code in for example TensorFlow or PyTorch for Polyaxon to run in what they call an experiment. Experiments can be part of an experiment group for doing hyper-parameter search.
Polyaxon takes care of executing the jobs based on an imperative definitions in the a similar way as Kubernetes does, it also takes care of saving the metrics and outputs of the jobs for analysis and selection. It has some features we are not gonna use here to do distributed training or using Tensorboard.
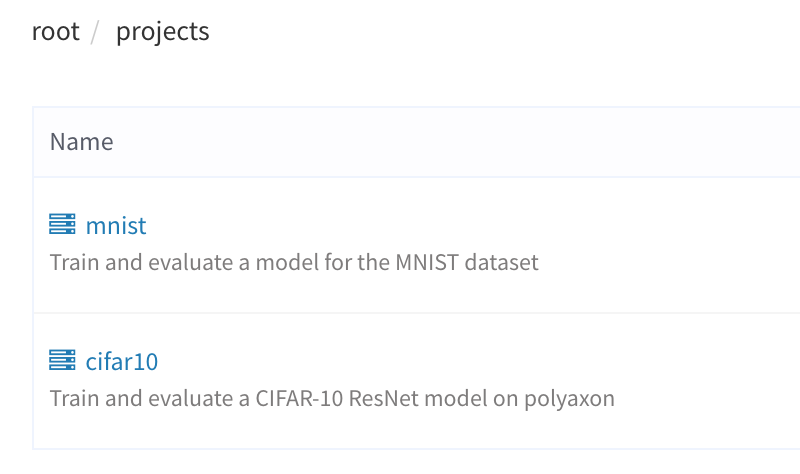
Following the Polyaxon docs we can create a new project based on the examples.
$ polyaxon project create --name=mnist --description='Train and evaluate a model for the MNIST dataset'
$ polyaxon init mnist
I wanted to test the hyper-parameter search so the polyaxon file looks like this:
---
version: 1

kind: group

hptuning:
  concurrency: 5
  random_search:
    n_experiments: 10

  matrix:
    lr:
      linspace: 0.001:0.1:5
    momentum:
      uniform: 0.5:0.6

declarations:
  batch_size_train: 128
  batch_size_test: 1000
  epochs: 5
  train_steps: 400

build:
  image: pytorch/pytorch:latest
  build_steps:
    - pip install --no-cache-dir -U polyaxon-helper

run:
  cmd: python run.py  --batch-size={{ batch_size_train }} \
    --test-batch-size={{ batch_size_test }} \
    --epochs={{ epochs }} \
    --lr={{ lr }} \
    --momentum={{ momentum }} \
    --epochs={{ epochs }}
Now we can run the experiment:
$ cd <polyaxon-argo-seldon-example repo>
$ polyaxon run -u -f polyaxonfile_hyperparams.yml
Based on the parameter space this command will create one experiment group with 10 experiments in that group. You can see the progress, logs, parameters, environment and more in the Polyaxon UI.
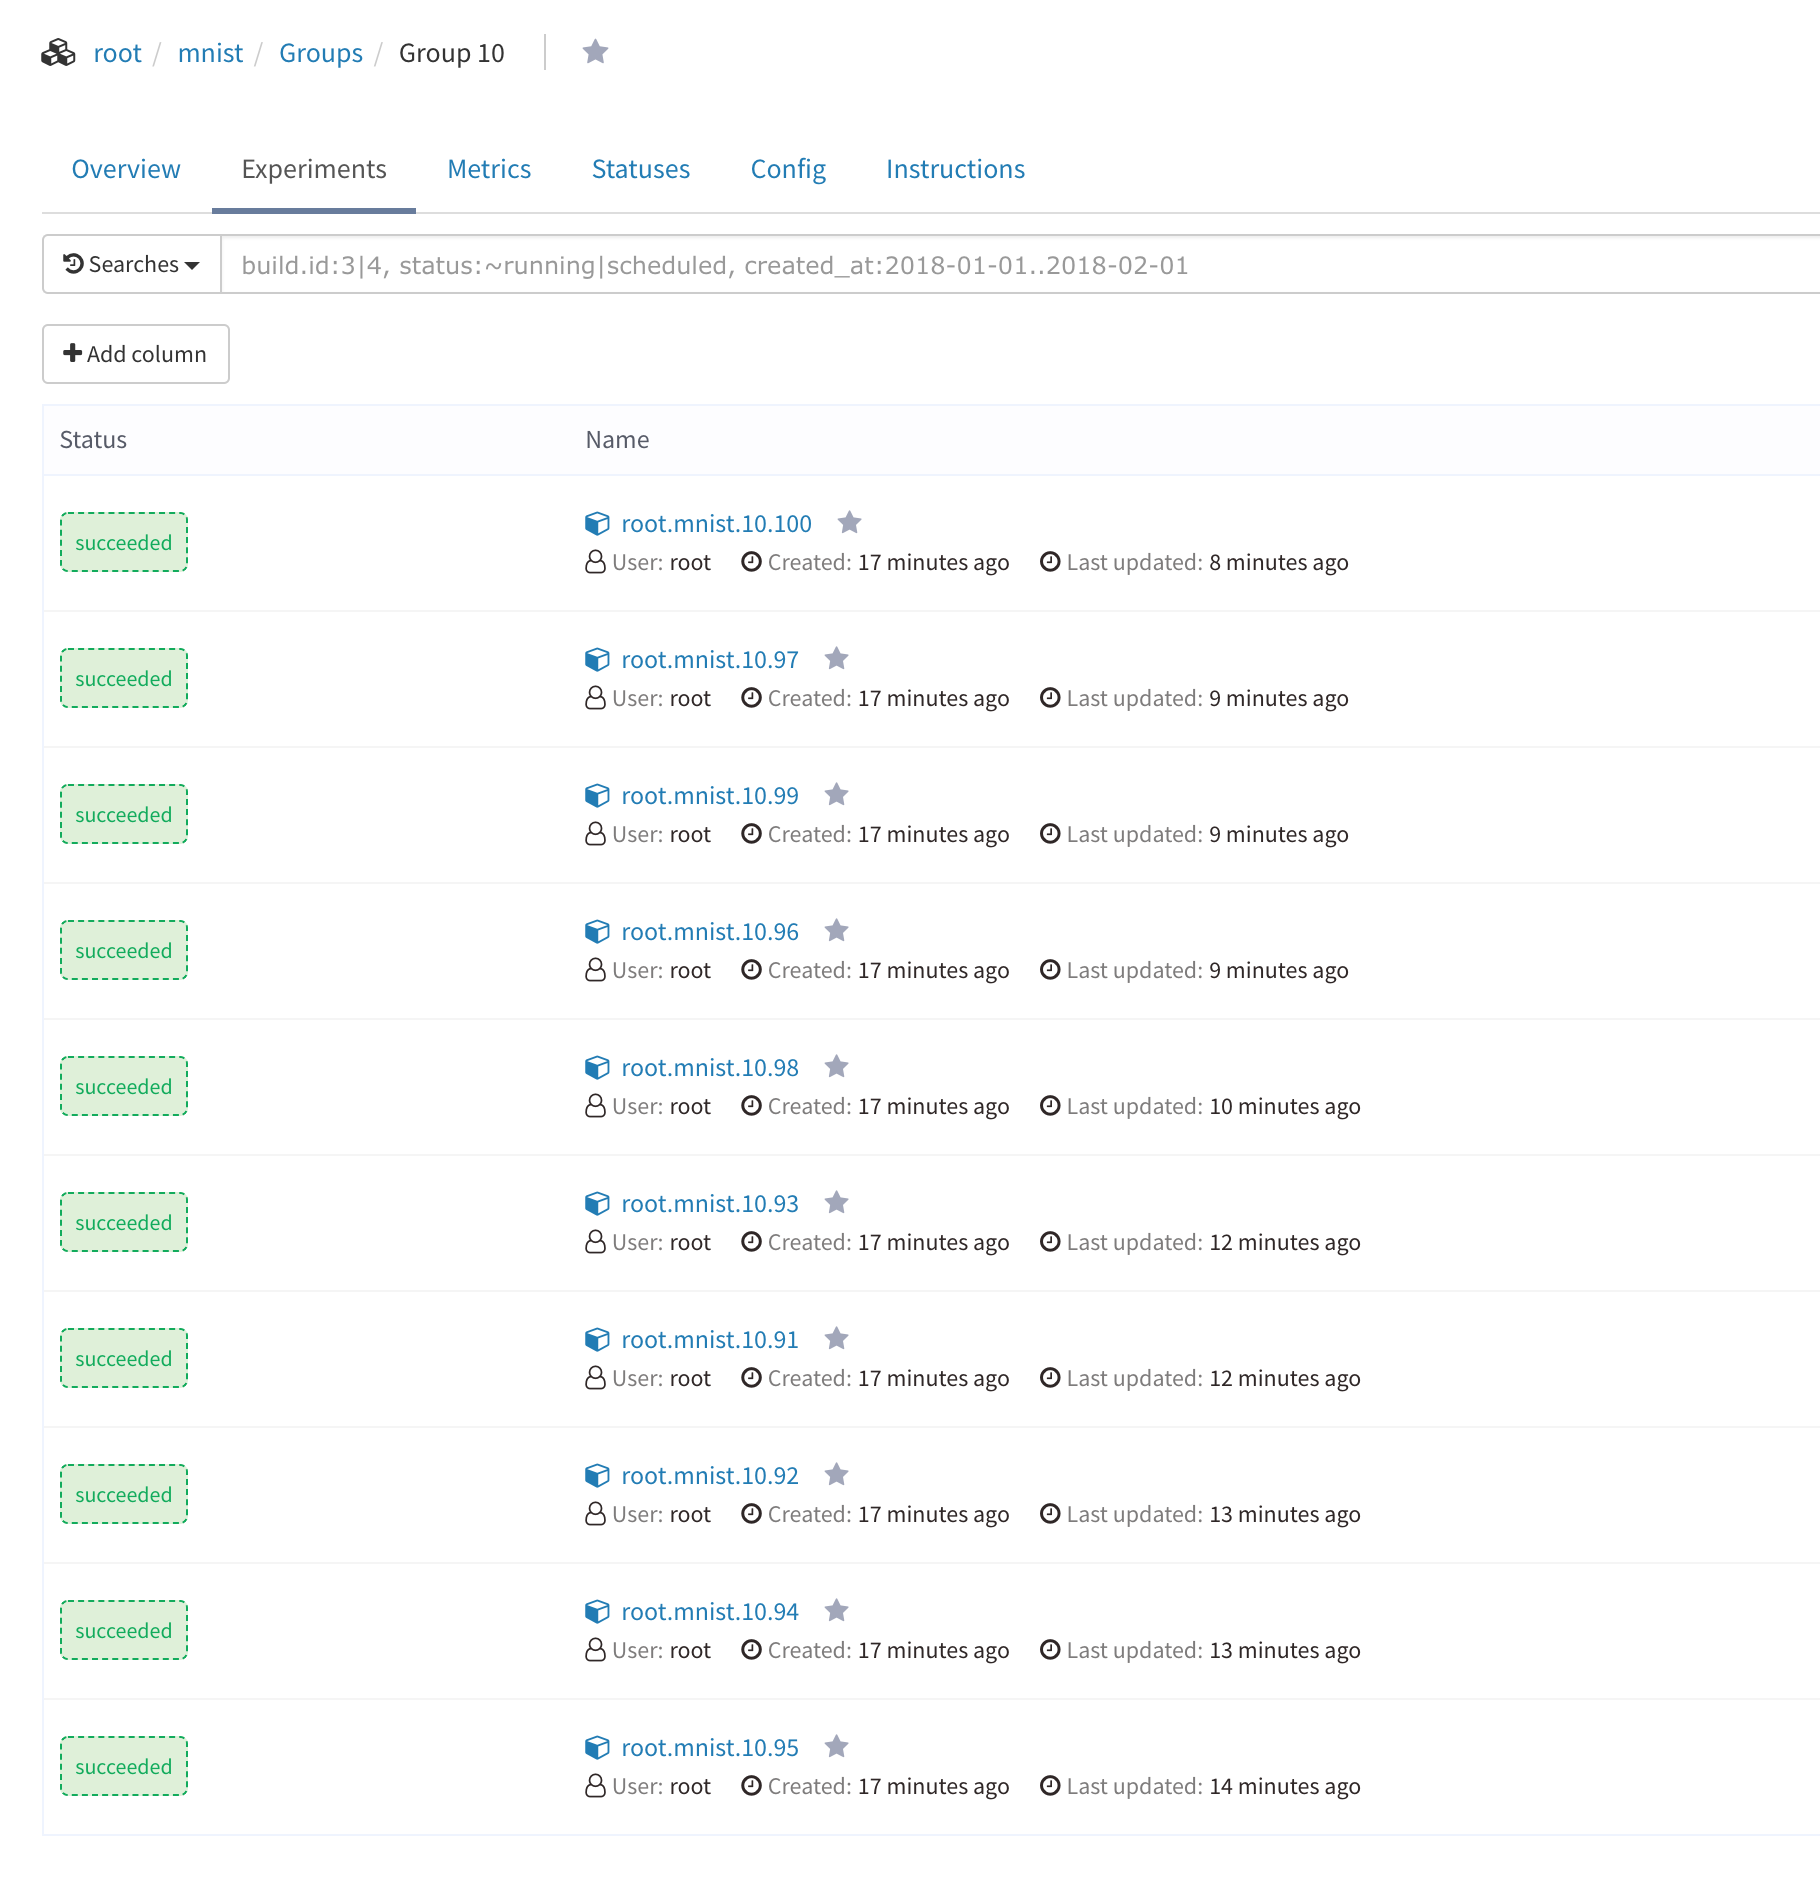
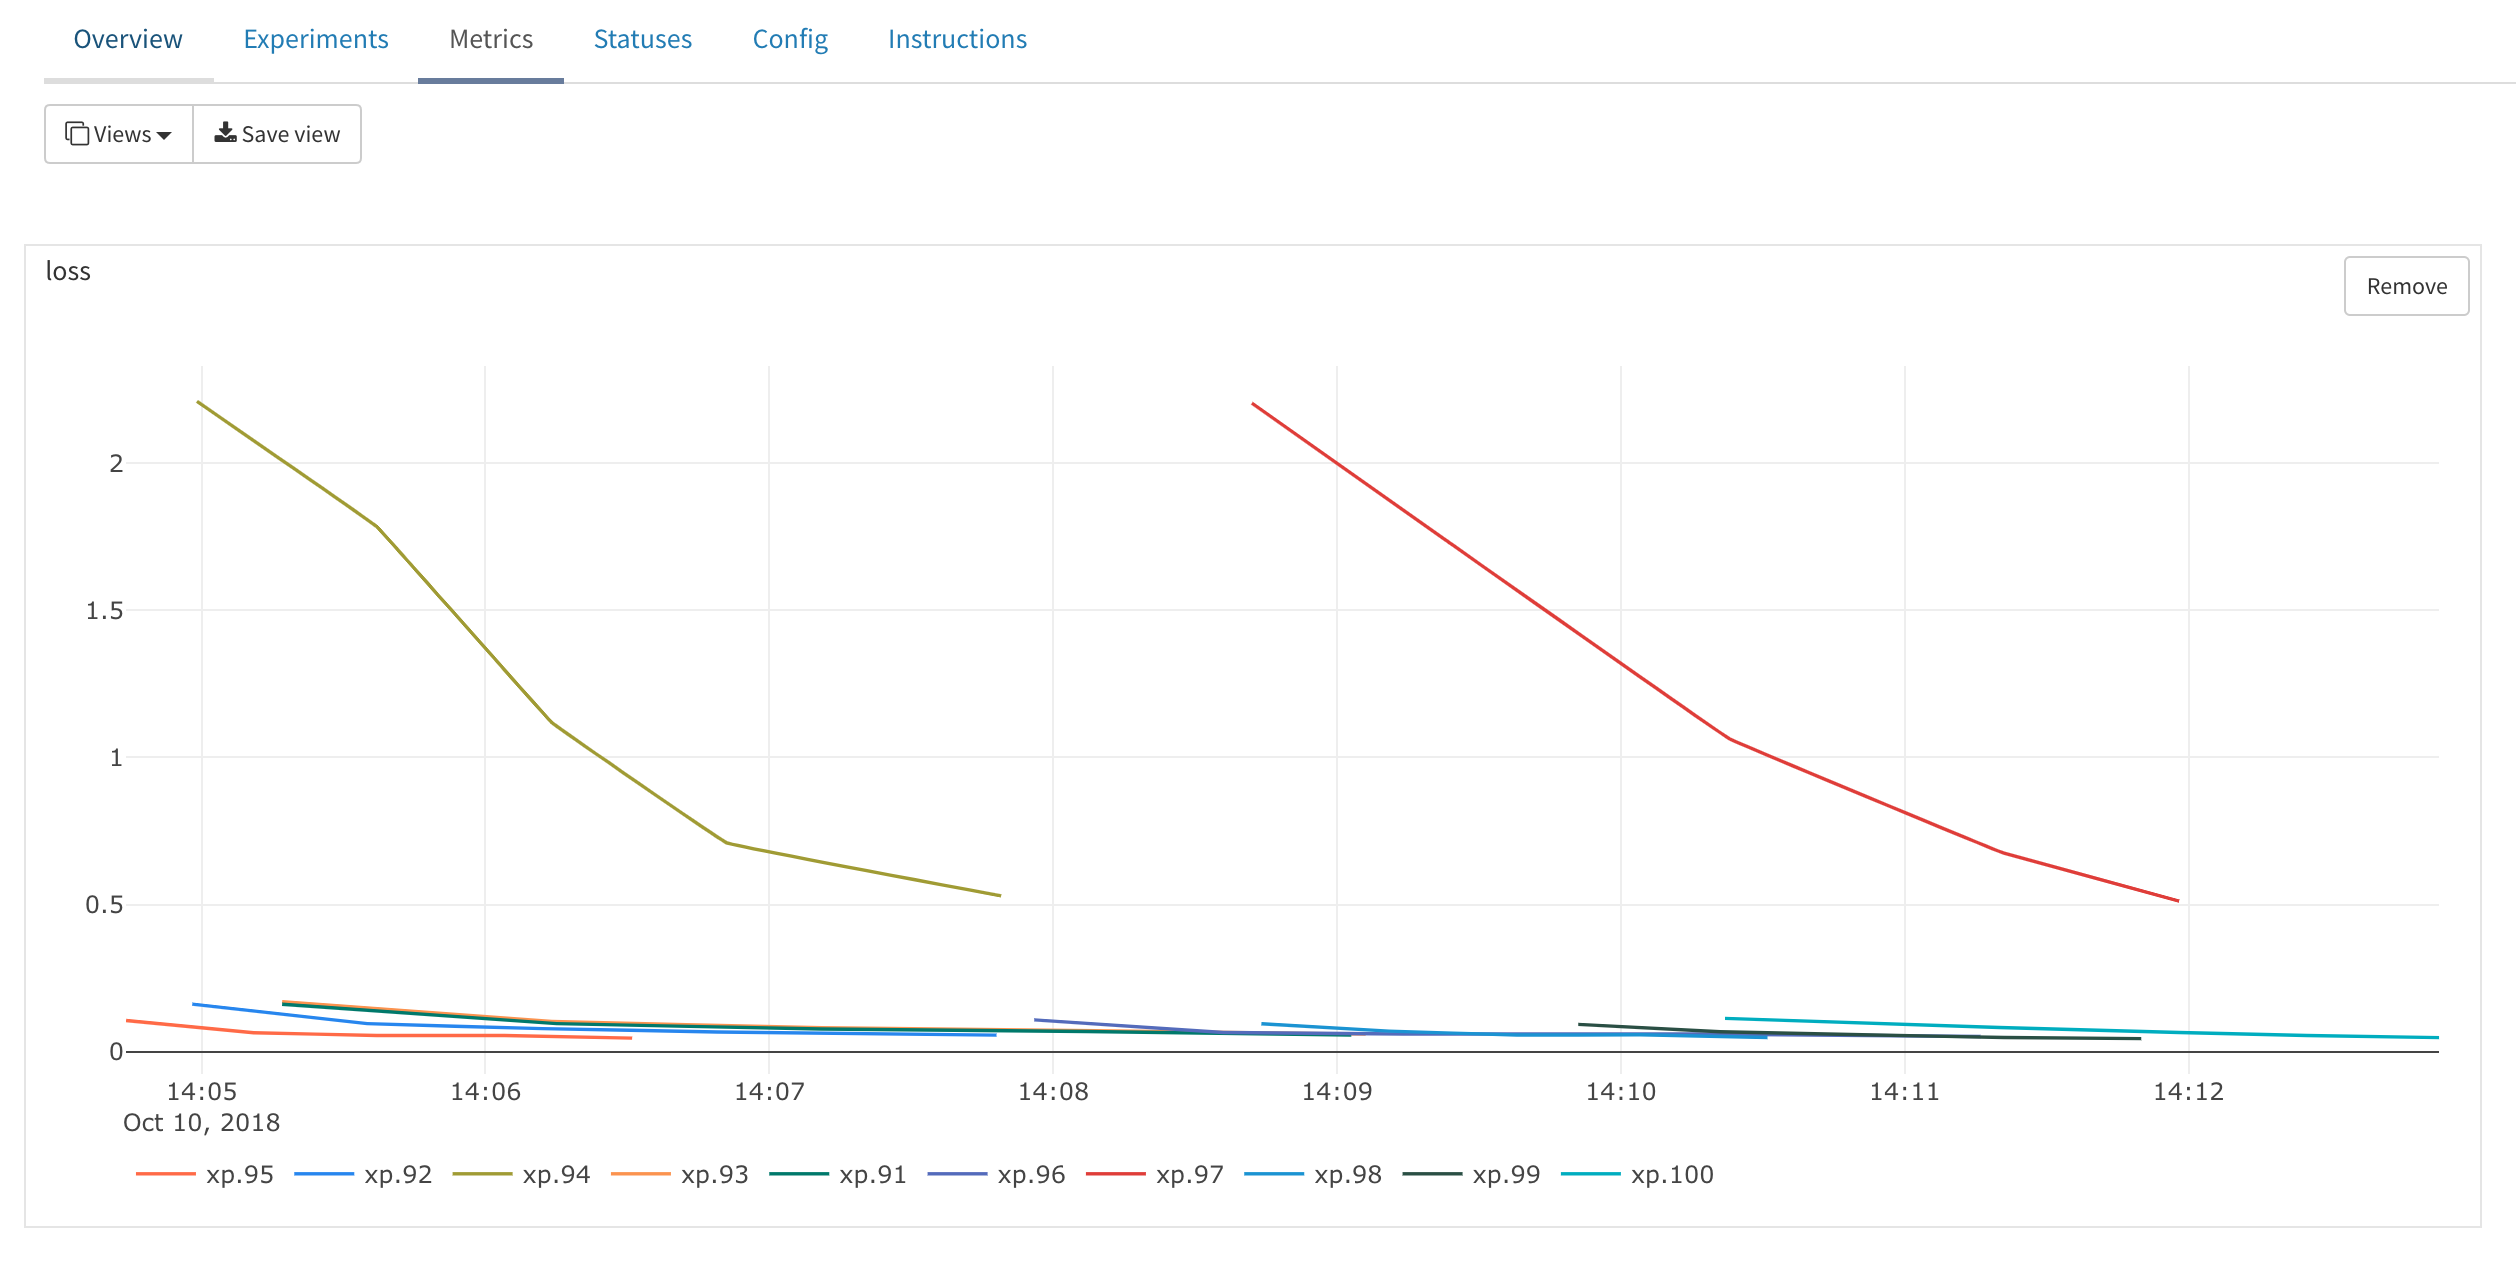
When the experiments are finished you’ll have 10 models that have been trained and can use Polyaxon to view metrics for those models and pick the best performing ones to deploy. Another option inside Polyaxon is to deploy Tensorboard server to view the metrics there if you have saved the output in that format, here I just used the native Polyaxon metrics.
You can take a look and download the trained models by just looking at the NFS server we launched before and going to the group and experiment directory, for example:
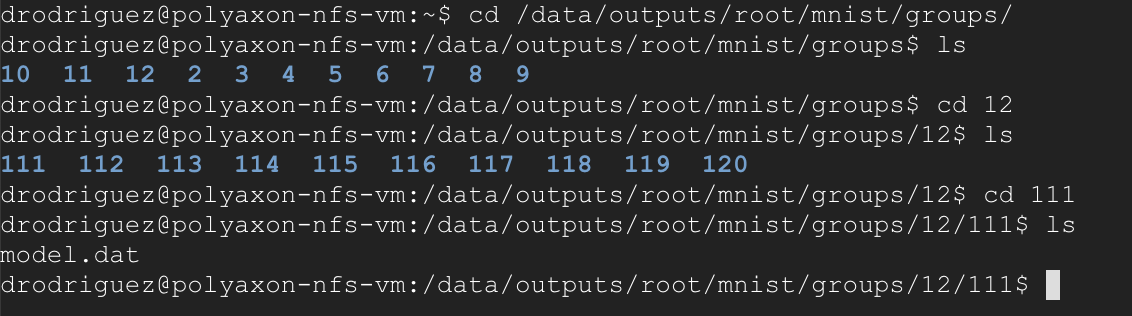
From Polyaxon to Argo
Now that we have trained and serialized models we need to package it and deploy it using Seldon. This requires some manual work as you need to create a Python class for Seldon to use, create requirements.txt and move the serialized model to the right location. Finally we need to use s2i to create the image using the base Seldon image.
All this process can be done manually locally by downloading the serialized model and using s2i but in the spirit of automating things I decided to do use Argo for this task.
I also wanted to keep most things in the Kubernetes cluster where models/data and others things are closer, so I used a Jupyter Lab server you can get up and running with this Kubernetes yaml spec:
apiVersion: apps/v1
kind: Deployment
metadata:
  name: jupyter
  labels:
    app: jupyter
spec:
  replicas: 1
  selector:
    matchLabels:
      app: jupyter
  template:
    metadata:
      labels:
        app: jupyter
    spec:
      containers:
        - name: jupyter
          image: jupyter/datascience-notebook
          command: ["start-notebook.sh"]
          args: ["--NotebookApp.token="]
          env:
            - name: JUPYTER_ENABLE_LAB
              value: "1"
          ports:
            - containerPort: 8888
          volumeMounts:
            - mountPath: /home/jovyan
              name: work-volume
            - mountPath: /output
              name: outputs-volume
      volumes:
        - name: work-volume
          persistentVolumeClaim:
            claimName: polyaxon-pvc-repos
        - name: outputs-volume
          persistentVolumeClaim:
            claimName: polyaxon-pvc-outputs
---
kind: Service
apiVersion: v1
metadata:
  name: jupyter
spec:
  selector:
    app: jupyter
  type: LoadBalancer
  ports:
    - protocol: TCP
      port: 80
      targetPort: 8888
This Jupyter Lab installation will have the right mounts for you move the serialized model:
$ cp /output/root/mnist/groups/12/120/model.dat /home/jovyan/deployments/mnist/After that create the files required for Seldon: the Python class for Seldon, the .s2i directory with the environment file inside and the requirements.txt. All of this is available in the repo. At the end should look similar to this:
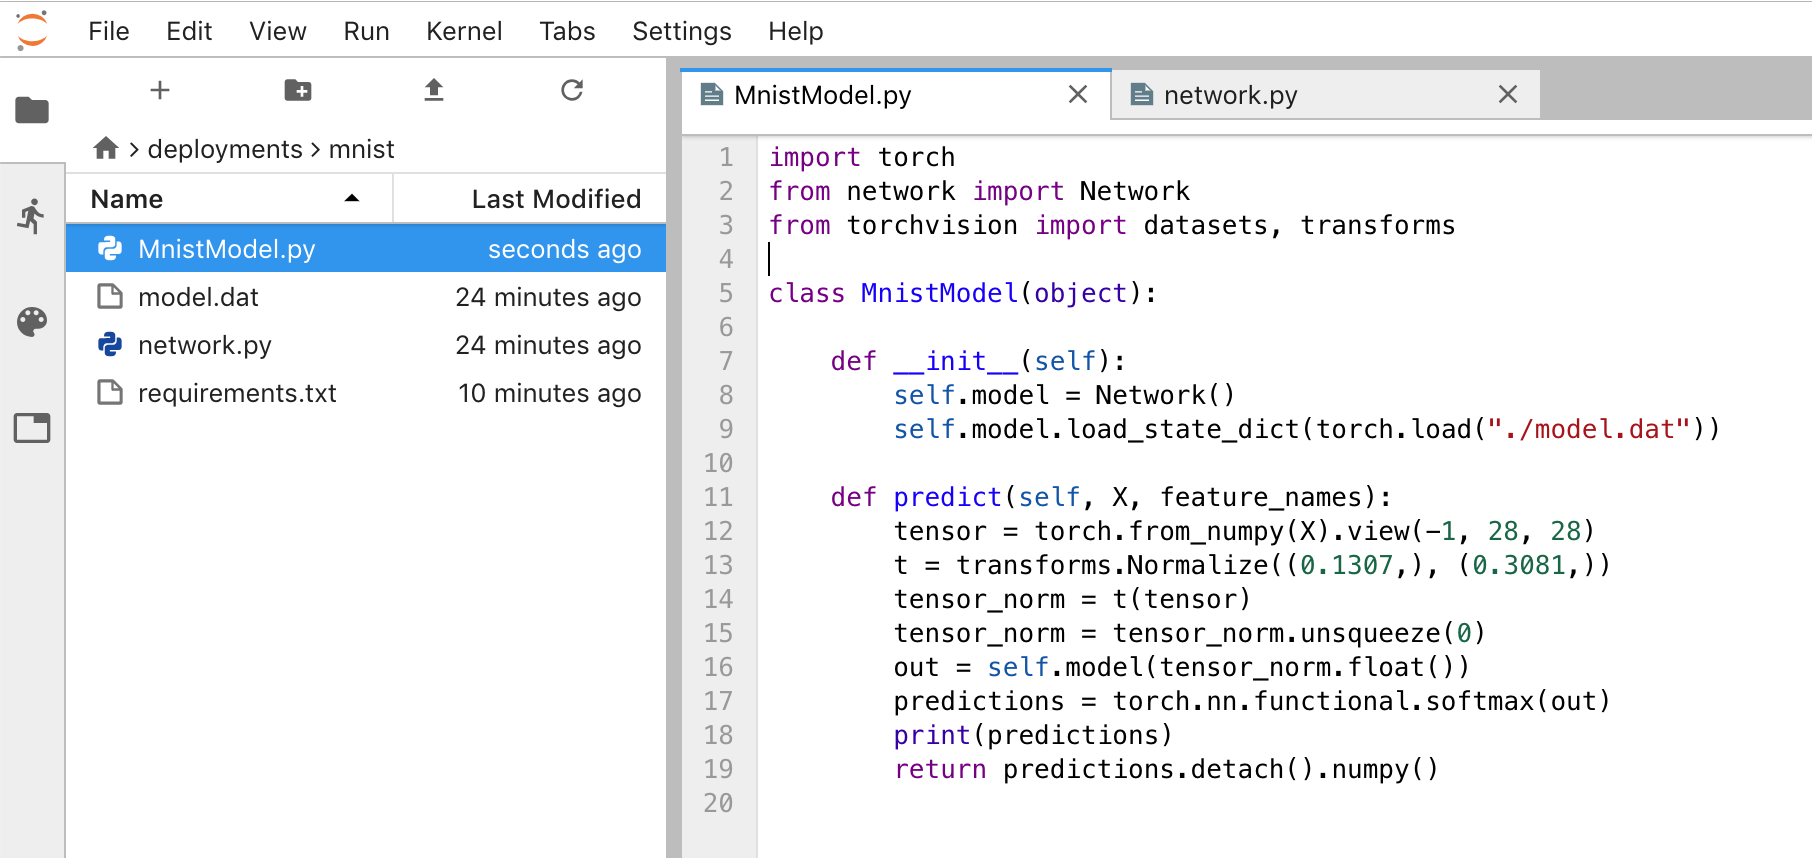
The actual Python class that Seldon uses is this:
import torch
from network import Network
from torchvision import datasets, transforms

class MnistModel(object):

    def __init__(self):
        self.model = Network()
        self.model.load_state_dict(torch.load("./model.dat"))

    def predict(self, X, feature_names):
        tensor = torch.from_numpy(X).view(-1, 28, 28)
        t = transforms.Normalize((0.1307,), (0.3081,))
        tensor_norm = t(tensor)
        tensor_norm = tensor_norm.unsqueeze(0)
        out = self.model(tensor_norm.float())
        predictions = torch.nn.functional.softmax(out)
        print(predictions)
        return predictions.detach().numpy()
This basically loads the seralized model in the __init__ function to later user that in the predict function, there we have some simple PyTorch code to preprocess the inputs to what the model expects.
We now have all we need to package the model as a docker image using Argo that Seldon can use.
Argo: Creating a docker image for the model
Argo is a workflow manager for Kubernetes. We will use Argo to build a reusable container-native workflow for taking the serialized model into a container that can be later deployed using Seldon.
To support this I created a simple docker image that executes s2i and pushes an image, Dockerfile is here and the docker image is available as danielfrg/s2i.
Since we are going to push an image to Docker hub first we need to create a secret with the credentials to login to the registry.
$ kubectl create secret docker-registry regcred --docker-server=<your-registry-server> --docker-username=<your-name> --docker-password=<your-pword> --docker-email=<your-email>With the image we can use Argo to manage the execution, the Argo pipeline mounts 3 things to the container:
- The Polyaxon volume to access the code we wrote in the previous section.
- The Docker socket to build the image and push
- The Docker credentials to push to the repository
apiVersion: argoproj.io/v1alpha1
kind: Workflow
metadata:
generateName: model-pkg-
spec:
entrypoint: model-pkg
volumes:
- name: work-volume
persistentVolumeClaim:
claimName: argo-pvc-repos
- name: docker-sock-volume
hostPath:
path: /var/run/docker.sock
- name: docker-config
secret:
secretName: regcred
items:
- key: .dockerconfigjson
path: config.json
templates:
- name: model-pkg
steps:
- - name: s2i-push
template: s2i
- name: s2i
container:
image: danielfrg/s2i:0.1
command: ["sh", "-c"]
args:
[
"s2i build /src/mnist seldonio/seldon-core-s2i-python3 danielfrg/seldon-mnist:0.2 && docker push danielfrg/seldon-mnist:0.2",
]
volumeMounts:
- name: work-volume
mountPath: /src
- name: docker-sock-volume
mountPath: /var/run/docker.sock
- name: docker-config
mountPath: /root/.docker
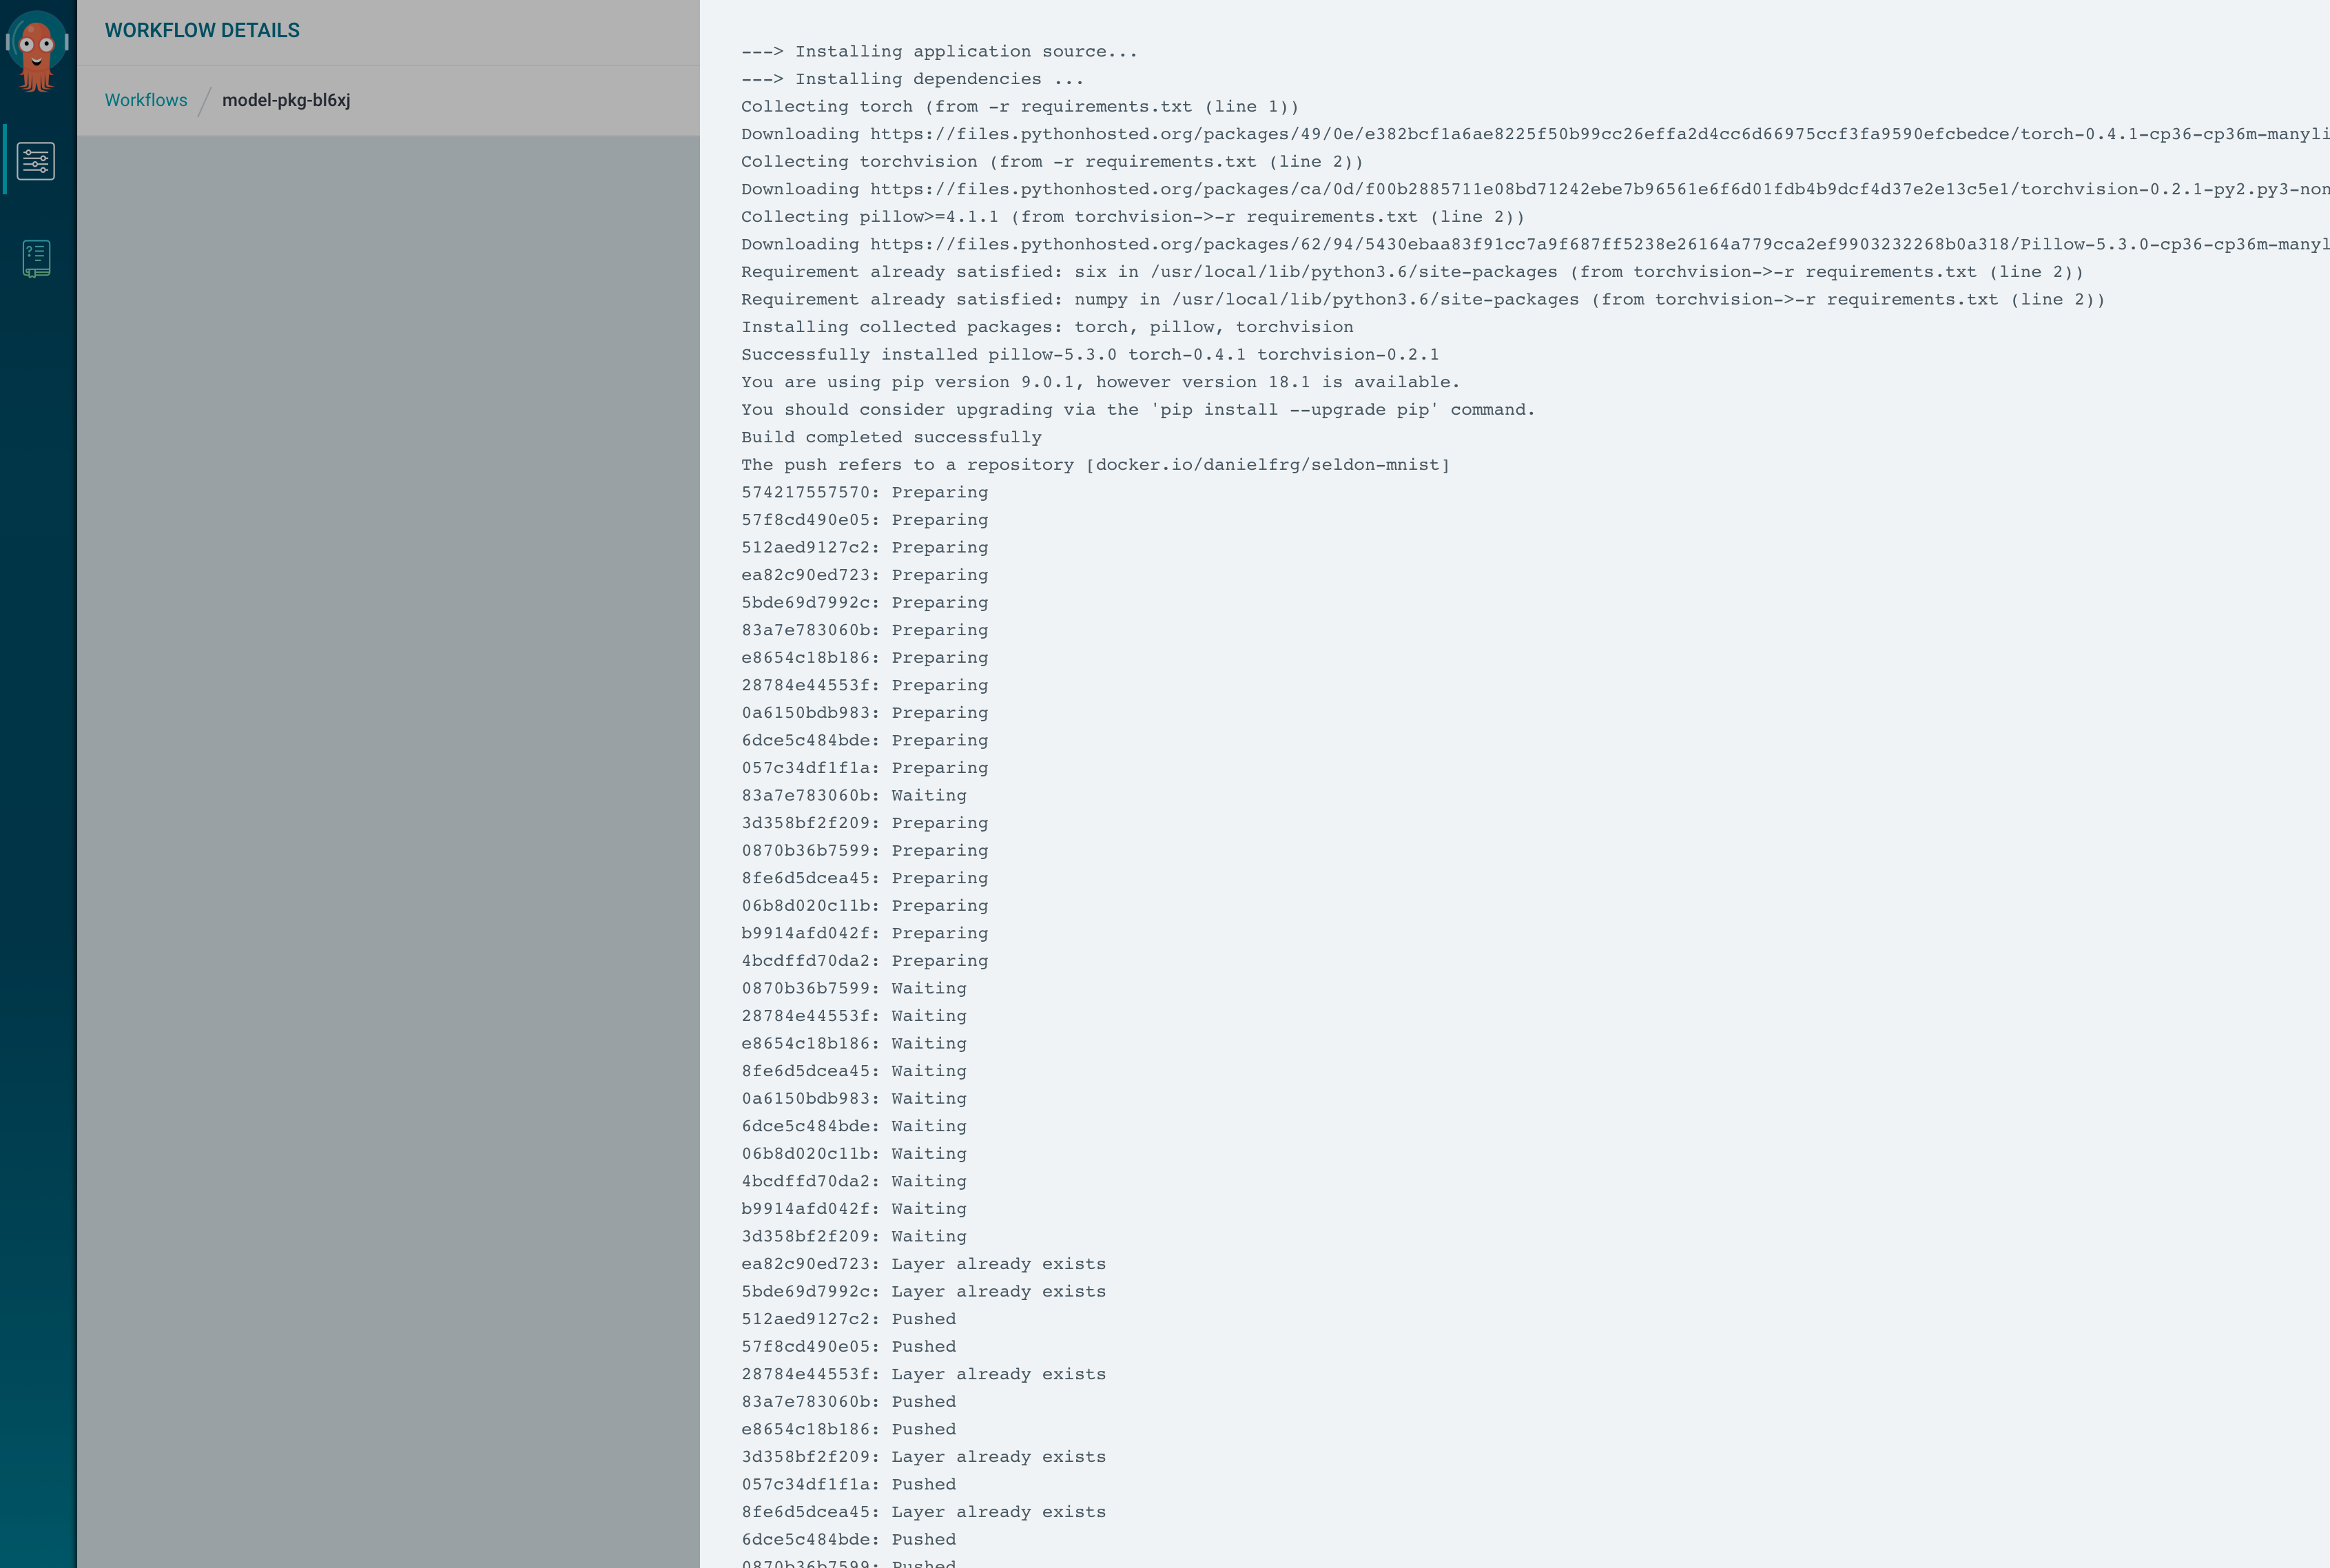
readOnly: trueThen just execute the argo pipeline
$ argo submit argo/pipeline.yamlThe pipeline uses s2i with the base Seldon image seldonio/seldon-core-s2i-python3, builds an image tagged danielfrg/seldon-mnist:0.2 and push that new image to Docker hub. Argo will handle all the execution and you can see logs and more in their UI:
Now that we have an image in Docker Hub we can use Seldon to deploy the image.
Seldon: Model deployment
Seldon is a great framework for managing models in Kubernetes. Models become available as a REST APIs or as a gRPC endpoints and you can do fancy routing between the models including A/B testing and multi-armed bandits. Seldon takes care of scaling the model and keeping it running all your models with a standard API.
Seldon uses its own Kubernetes CRD and it will just use the Docker image that the Argo pipeline pushed, the Seldon deployment CRD spec looks like this:
apiVersion: machinelearning.seldon.io/v1alpha2
kind: SeldonDeployment
metadata:
  name: mnist
  labels:
    app: seldon
  namespace: seldon
spec:
  name: mnist
  predictors:
    - componentSpecs:
        - spec:
            containers:
              - image: danielfrg/seldon-mnist:0.2
                imagePullPolicy: Always
                name: classifier
      graph:
        endpoint:
          type: REST
        name: classifier
        type: MODEL
      labels:
        version: v1
      name: mnist
      replicas: 1
This will create a couple of Kubernetes Pods that include the model running and handle other routing stuff.
After all this work we can finally query the model!
Since we deployed a REST API we can query this deployed model using a little bit of Python to read and image and make a HTTP request:
import requests
import numpy as np
from PIL import Image

API_AMBASSADOR = "localhost:8003"


def load_image(filename):
    img = Image.open(filename)
    img.load()
    data = np.asarray(img, dtype="int32")
    return data


def rest_request_ambassador(deploymentName, imgpath, endpoint=API_AMBASSADOR):
    arr = load_image(imgpath).flatten()
    shape = arr.shape
    payload = {"data":{"names":[], "tensor":{"shape":shape, "values":arr.tolist()}}}
    response = requests.post(
        "http://"+endpoint+"/seldon/"+deploymentName+"/api/v0.1/predictions",
        json=payload)
    print(response.status_code)
    print(response.text)

rest_request_ambassador("mnist", "images/87.png")
The output for this will be a prediction for the image, the 87th image is a 9 and the prediction is indeed that.
{
  "meta": {
    "puid": "6rtbtvkvlftfeusuej5ni4197q",
    "tags": {},
    "routing": {},
    "requestPath": {
      "classifier": "danielfrg/seldon-mnist:0.2"
    }
  },
  "data": {
    "names": ["t:0", "t:1", "t:2", "t:3", "t:4", "t:5", "t:6", "t:7", "t:8", "t:9"],
    "tensor": {
      "shape": [1, 10],
      "values": [0.0, 0.0, 0.0, 0.0, 0.0, 0.0, 0.0, 0.0, 0.0, 1.0]
    }
  }
}
Seldon has a lot of other features that are not explored here, check their website.
Thoughts
This looks really hard, there must be a better way! There is probably is much better ways. Most companies with big data science teams have been building similar infrastructure and some are available to use, for example:
- TFX from Google/TensorFlow, paper here
- KubeFlow, a collection of tools also from Google, it uses Seldon
- Folilla from StitchFix. Also check out Juliet Hougland great talk on how Stitch Fix does Production Model Deployment
- IBM/FfDL
- Uber Michelangelo
- Clipper, a more low level tool for serving models
- Instacart Lore
There is also of course companies that have products you can buy around this:
- Anaconda Enterprise (disclaimer this where I work)
- Domino Data Lab
- DataBricks
- all cloud providers
- and many more.
The options are endless depending on your use case and you should pick and build in top of everything. Kubernetes is a real platform in the sense that you can actually extend it as you need, this is an example of that. There is a lot of stuff missing that you can possibly add to make the ultimate model management platform, for example: monitoring, multiple users, authentication and security, audits, a catalog for the models as docker images, central storage should be NFS or object store or something else?
Each of this features will increase the cost significantly.
Jupyter Hub and Binder. This process integrates relatively well with some previous work I have posted here on Jupyter Hub in Kubernetes for a multi-user dev environment. Great multi-user collaboration is a key part of the process. Also don’t forget that the end result is usually not an API but some sort of application, dashboard or report and deployment for those applications is also important.
Why not just use Argo to do the model training? You could, I think Polyaxon right now is better for model training since it just does that, Argo its more general and thats great but specialized tools sometimes are better. Argo’s architecture is more complex and extensible so other tooling could be build on top of it, I imagine that will happen eventually.
What to do with this? Take it as a simple experiment to show of what is possible today with open-source frameworks around model management on Kubernetes. Take this and adapt it to your needs. The objective it to make your life easier, make iterations faster and models better.
This pipeline is useful as described here but it’s far from being complete. This will save you some time right now but some manual parts needs to be automated. You will need to work on integrating this (or anything) into your existing workflow around Git and CI/CD (Jenkins).